
Picture this: Ravi runs a thriving online store that sells handcrafted items. While his products are popular, payment collection is a headache. Some customers abandon purchases when faced with complicated payment processes, while others hesitate to share sensitive financial details on unfamiliar platforms.
This is where UPI comes in. The Unified Payments Interface has transformed India's digital payment landscape, with transaction values growing exponentially from ₹21.3 lakh crore in FY 2019-20 to a massive ₹260.56 lakh crore by March 2025.
For merchants like Ravi, UPI offers immediate benefits: instant settlements, reduced transaction costs, wider customer reach, and simplified payment collection. With UPI's rapidly growing adoption rate, integrating this payment method is no longer just an option—it's becoming essential for Indian online businesses.
This guide helps Indian online merchants understand and implement UPI payment options through practical, step-by-step instructions for various integration methods, enabling them to boost sales and improve customer satisfaction.
Content Index
Understanding the UPI Ecosystem in India
Let's break down how UPI works in simple terms. Think of UPI as a bridge connecting different bank accounts. It lets customers transfer money directly from one bank account to another instantly, using just a mobile app. No need for account numbers, IFSC codes, or complex banking details.
UPI was launched in April 2016 by the National Payments Corporation of India (NPCI) in collaboration with the Reserve Bank of India (RBI). What started as a simple payment system has evolved into a comprehensive digital payment ecosystem, now supporting features such as QR code payments, recurring payments, and international transactions.
Key Players in the UPI Ecosystem
The UPI ecosystem involves several interconnected participants:
NPCI (National Payments Corporation of India): The backbone of UPI, NPCI develops and manages the UPI platform, setting the rules for how it operates
Banks: Banks connect to the UPI system and manage the actual money movement between accounts. They validate and process the transactions.
PSPs (Payment Service Providers): These companies provide the technical infrastructure to process payments. They act as intermediaries between merchants and the UPI network.
TPAPs (Third Party App Providers): Companies like Google Pay, PhonePe, and Paytm create user-friendly apps that connect to the UPI system. These are the apps that consumers use for making payments.
Merchants: Businesses that accept UPI payments from customers, either through their systems or through payment gateways.
The Unique UPI Address System
At the heart of UPI is a simple addressing system that makes payments easy:
UPI ID or VPA (Virtual Payment Address): This works like an email address for your bank account. Instead of sharing your bank details, you simply share your UPI ID (for example, yourname@bankname). This ID is linked to your bank account behind the scenes, keeping your actual account details private.
For example, a customer with the UPI ID "ravi@okaxis" can send money to a merchant with the ID "craftstore@paytm" without needing to know each other's account numbers. The UPI system routes the payment correctly based on these simple IDs.
The simplicity of this system has driven massive adoption across India.
Types of UPI Integrations for Businesses
When setting up UPI payments for your business, it's important to choose the correct integration method based on your specific needs. Let's look at the different options available:
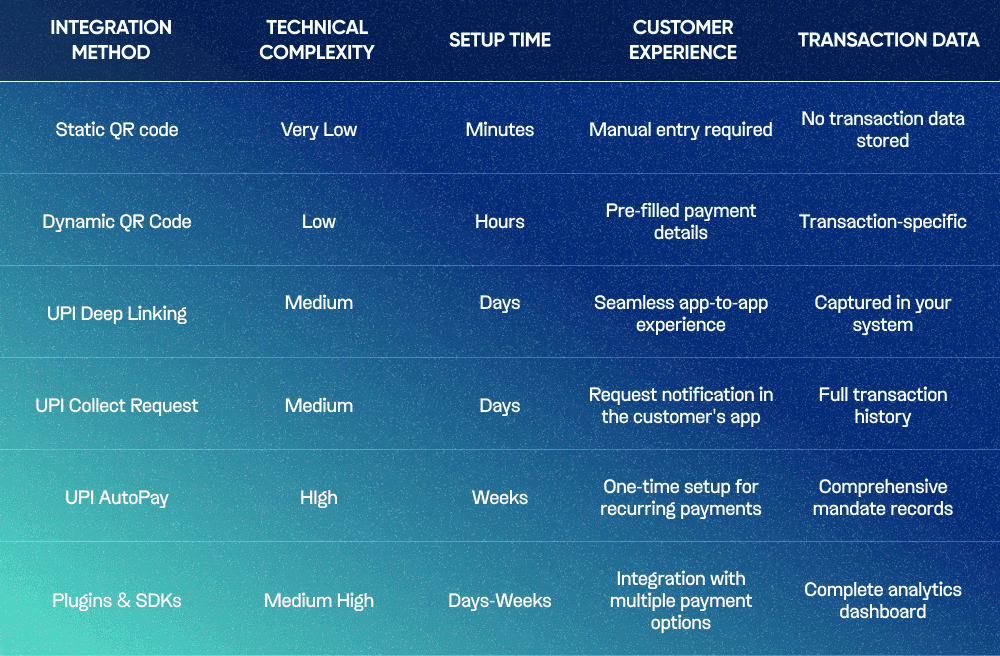
Static QR Code
This is the simplest form of UPI integration, perfect for small merchants or businesses just starting with digital payments.
A static QR code contains your UPI ID or VPA, but no transaction amount. Customers scan the code using their UPI app, then manually enter the payment amount and purpose. Once generated, this QR code remains the same for all transactions.
Best for: Small retail shops, street vendors, or any business with changing transaction amounts but limited technical resources. You can print this QR code and display it at your counter or include it on invoices.
Dynamic QR Code
Unlike static QR codes, dynamic QR codes include specific transaction details, such as the amount, merchant name, and transaction reference. Each transaction generates a unique QR code.
When a customer scans this code, all payment details are automatically filled in their UPI app. They simply need to authorise the payment with their UPI PIN.
Best for: E-commerce checkouts, restaurants with table-specific bills, or any business that needs to specify exact payment amounts.
UPI Deep Linking
This integration creates a direct link between your app or website and the customer's UPI app. When customers click a "Pay with UPI" button, they are automatically redirected to their preferred UPI app with the transaction details pre-filled.
The process happens through intents (on Android) or specialised URLS that trigger UPI apps. After completing payment, the customer is redirected back to your app or website.
Best for: Mobile apps, e-commerce websites, and businesses wanting a seamless checkout experience without complex integrations.
UPI Collect Request (Pay by VPA)
This method lets you send payment requests directly to customers' UPI IDs. The customer receives a notification in their UPI app and can approve or reject the payment.
You need to collect the customer's UPI ID first, then initiate the collection request through your payment system. This puts you in control of the payment process.
Best for: Businesses with recurring customers, subscription-based services, or situations where you already have the customer's UPI ID.
UPI AutoPay (for subscriptions)
UPI AutoPay enables recurring payments with a one-time mandate. Customers authorise your business to automatically debit a specified amount at regular intervals (e.g., daily, weekly, monthly).
The customer approves the mandate only once, and subsequent payments happen automatically on scheduled dates until the mandate expires or is cancelled.
Best for: Subscription services, SaaS products, loan repayments, insurance premiums, or utility bill payments.
UPI Plugins and SDKs
For more complex business needs, payment gateways and aggregators offer plugins and Software Development Kits (SDKs) that simplify UPI integration.
These ready-made solutions handle the technical complexities of payment processing, security, and reconciliation. They often provide a dashboard to track transactions and generate reports.
Best for: Medium to large businesses seeking comprehensive payment solutions without having to build everything from scratch. Platforms like Nimbbl offer multi-payment gateway solutions that include UPI among various payment options.
Choosing the proper UPI integration method depends on your business model, technical capabilities, and customer expectations. Many businesses use multiple methods to provide flexibility at different touchpoints in their customer journey.
Step-by-step UPI Integration Guide
Setting up UPI payments for your business might seem technical, but breaking it down into manageable steps makes the process straightforward. Here's how to get started:
Choosing an integration method
API Integration - Full control, requires development resources, highly customisable
SDK Integration - Pre-built components with some customisation, balances control and speed
Plugin Integration - "Plug and play" solution for platforms like WordPress or Shopify
Choose based on your technical resources and business size
Selecting a payment service provider
Compare transaction fees and settlement timelines
Evaluate additional features (analytics, reconciliation tools)
Check integration support quality and documentation
Look for providers offering multiple payment methods through one integration
Assess uptime and reliability statistics
Merchant onboarding process
Register as a merchant and create an account
Submit KYC documentation (business certificates, PAN, bank details)
Complete integration agreement
Obtain merchant credentials
Allow 3-7 days for verification and approval
Implementation basics
Set up the development environment using the PSP documentation
Add UPI as a payment option at checkout
Configure webhook endpoints for payment notifications
Implement error handling for failed transactions
Set up reconciliation processes
Testing and going live
Use a sandbox environment to simulate transactions
Test multiple scenarios (success, failure, errors)
Conduct QA testing across devices and UPI apps
Switch to production environment
Monitor early transactions closely
Review performance metrics regularly using PSP dashboards
Conclusion
UPI has transformed how Indian businesses accept payments. For merchants, it offers faster settlements, lower costs, and wider customer reach.
Ready to implement UPI? Start by:
Assessing which integration fits your business
Comparing payment providers beyond just fees
Beginning with simple solutions like QR codes
Testing thoroughly before full deployment
Providers like Nimbbl offer comprehensive solutions that handle UPI alongside other payment methods, improving reliability and security while simplifying the integration process.
Payment Gateway

